easycode - EAB

Adding or Removing Access Codes (PIN's)

Please read before going any further -

The access codes can be derived by an number of sources.
  • The codes can be simply be "made up" with 4-10 numbers
  • The codes can only be numbers. No spaces, no letters, no *&#^ special characters
  • To activate remote controls, on the back of the remote control is a pin code Generally 5-6 numbers. Use that number to enroll your new remote control.
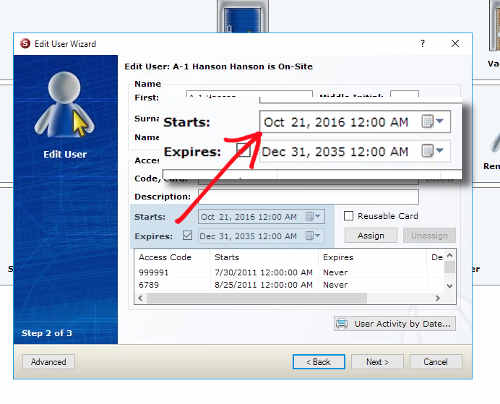
  • You can also remove access codes. Instructions are contained in this tutorial

If you are unsure about the remote login process, go HERE for a tutorial

After you log onto the system, you will see this screen / desktop. Click on the icon indicated by the arrow.

...


You will see the first challenge screen (not shown), where you log into the security system.

After logging in, you will see the scrren as pictured on the left. Click on the icon indicated by the red arrow.

...


Select the unit or user name for the unit you wish to add or delete the access codes /PIN number. Then click "NEXT" (I blurred out the access codes for obvious reasons)

...


Step one - Enter your new code where the arrow numbered #1 is located (if the number is in use, the system will let you know and will not go any furter).

Step two. Click "assign".(Arrow with #2) This loads the new number into the database. Also, you can highlight or click on any number from the list and "unassign" it. In other words remove it.

Click "Next" (Arrow #3)

...

Setting vendor codes-

There is also a feature where you can set Vendor codes. These are access codes that expire at some time in the future). Add the access code you desire, (just as shown above), then click on the calender icon. You can set when the code becomes active (In the future, or set a date when the code will expire, such as one week, two weeks etc. This is a feature asked for when a client needs to give temporary access to a vendor for work on their RV.
Just click on the "Next" button following entry of the code and date.

...


Just click on done.

...


You will see a series of confirmation screens like this one. Just click yes until you are back to the main screen. You are done.

Close the StorLogix software and disconnect your session when done.

...